 Over the years I made wine using different fruits and juices. They differed in ways of initial processing and in flavor. I make my wine without chemical additives. That is as close to all natural wine as I got. The next notch would be to use organic fruits or juices, but the whole cost will increase significantly, unless you grow your own organic fruits. I have done once a small batch of organic wine from the wild blackberries, and it was definitely worth the effort. The flavor was exceptional. Now, when I reminisce about it, I’ll probably do it again after the next year’s crop. It was gooood!
I like to use concentrated juice over the whole fruit in the process of winemaking. Using juice allows to skip the fruit pressing step, makes the batch cleaner and easier to work with. And the flavor is not compromised.
After many years of experimenting, I found my favorite - concord grape wine - and that is what I continue to make. I buy the frozen concentrated juice, NOTE: without sulfates added. Most concentrated juices contain the sulfates, but check the ingredients and you’ll find the one without sulfates. Red wine is my favorite so concord grape juice suits me well.
My most basic idea regarding winemaking is to keep it simple. My first batch was so labor intensive, that I almost gave up the winemaking altogether. Then, I thought, there has to an easier way. After all, as the legend says, invention of wine happened by accident… it must have been simple. I don’t use any chemicals to clean the equipment, to enhance the flavor or to clarify the wine. My main objective is to create the natural, healthy beverage. The following recipe is for the sweet desert wine. If you like, you can reduce the amount of sugar for more dry effect.
EQUIPMENT
To make any kind of wine, basically the same equipment is needed: glass carboy, a couple of large…, large pots, carboy bung, funnel, measuring cup, water lock, bottle brushes for bottles and carboys, steering paddle, siphon tubing, bottles, corks. All those supplies can be found online or at your local winemaking supplier. I use the glass carboy for the entire process of fermenting, so I didn’t list the primary fermentation pile, but you can certainly add it to your list.
PREPARING THE MIXTURE
The most important thing in making a good batch of wine is to keep everything as clean as possible. The wine can spoil easily, and you’ll end up with a big batch of … vinegar. So, I start with boiling the concentrated juice in a big pot for 20 min. I do the same with the water with sugar. This process should kill the unwanted bacteria.
As I said, I don’t use the primary fermentation pile, just the carboy. Before use, I wash the carboy using dishwashing liquid, hot water and bottle brushes, assuring all surfaces are scrubbed well, then thoroughly rinsed with hot tap water. The bung and water lock are washed with dishwashing liquid and hot water, then rinsed well with hot tap water.
I use 3 gallon carboys so the recipe is for this size of the carboy. The recipe is for the sweet desert wine. If you like you can reduce the amount of sugar for more dry effect.
INGREDIENTS:
- 10 12oz cans - frozen concentrated concord grape juice without sulfates
- 5 ½ lb - sugar (added in 3 stages)
- 1tbsp + 1tsp - dry active yeast
- 7qts - water
- 1tsp - ascorbic acid (or 2 tbsp of lemon juice)
DIRECTIONS:
1. Boil 4qts of water with 3lb of sugar for 20 min and cool to room temp. Boil the rest of the water in a separate pot without sugar and also cool to room temp.
2. Boil the juice for 20 min and cool to room temp.
3. Dissolve yeast in 8-10oz glass of water (use boiled and cooled water).
4. Pour juice, water with sugar and dissolved yeast into a clean carboy. Mix thoroughly, add water to fill about 80% of carboy. Mix again, close with water lock leave away from direct light and the room temperature about 70F. I keep mine on the kitchen counter. If direct light can not be avoided, simply wrap the glass carboy with a bath towel. Direct light may stimulate unwanted bacteria to grow.
5. For next 3 days stir the mixture once a day. It can be done with a paddle or just give it a good swoosh swirling the bottle. Do it carefully; fermenting mixture is bubbly so be careful not to let it go to the water lock. If it does, just remove the lock and rinse it in a cold running water.
6. For next 7 days, leave the carboy alone and let the fermentation continue. There should be tiny bubbles of fermentation gasses rising up from the mixture. You will see them and smell them too. It’s good to keep the carboy in a place where it will be easy to rack it without
7. After next 10 days the fermentation will slow down. It’s time now to rack the mixture to a clean carboy using the siphon tube. Don’t move the carboy before racking, we don’t want to disturb the sediment. The objective is to separate the clear mixture from the sediment. I rack to a clean, big pot, then wash the carboy and pour the mixture right back to it. Dissolve 1 ¼ lb of sugar in 24oz of water and boil it for 20 min, then cool to room temperature. Boil and cool more water to fill the carboy 3 to 4in from the top edge of the neck. The water lock needs to be rinsed well in cold water and reinstalled on the carboy.
8. After next 2 weeks rack the mixture again and add another 1 ¼ lb sugar using directions from pt 7. After that, place the carboy in a cooler, dark space, around 60F and leave for next 5 weeks. If dark space is hard to find wrap the carboy in a bath towel. Be patient…
9. Rack the wine every 5-6 weeks until at least 4 months from the beginning of the process. Racking will make the wine clear. Once, I have kept the wine in the carboy for almost a year racking every 6-8 weeks for the last 6 months and the wine turned out great. Patience does pay off in winemaking.
10. After you decide that the wine is clear enough for bottling, rack the last time and bottle. Mature at least 6 months. Best after matured at least 3 years. Enjoy.
 Raw sauerkraut is extremely beneficial in maintaining a healthy and strong immune system. It also has a lot of fiber and it's great in a wait loss program. There is no problem finding the jar of the sauerkraut at the grocery store, but they are always pasteurized. The pasteurization kills bad bacteria but also kills the good bacteria. Well, you decide what’s best for you. I like to eat raw food often. Here’s a simple recipe for raw sauerkraut, and if you have reservations regarding the raw version, simply cook the jars with fermented cabbage (about 2 weeks after the fermentation stopped) like other preserves.
INGREDIENTS:
48 oz - cabbage
5 oz - carrot
1 oz - salt
1 tsp - caraway seed
Water to top the cabbage in the jar (boiled and cooled to room temperature)
EQUIPMENT:
- Chef’s knife or food slicer
- Cutting board
- 8 qt bowl
- 4 x 24 oz jars, or 1 large jar (jars do not need to have the sealed closure unless you decide to pasteurize them)
 DIRECTIONS:
1. Cut the cabbage in quarters, remove core, and then slice it as thin as you can. The thinner, the better.
2, Grate the carrot, mix with the cabbage. Add caraway seeds, divide in even portions and put in jars. Do it in layers adding salt between every layer.

3. Pour water to cover the cabbage in jars and close the lids. Turn jars upside down and back several times to assure dissolving of the salt.
4. Place upwards on the countertop, open the lids and assure all cabbage is covered with water, then loosely cover the jars with lids allowing the fermenting gasses to escape in next 3-5 days. Leave standing away from the direct sunlight.
5. For next 4-5 days the cabbage will ferment and the bubbles of gas will percolate. Make sure the lids are NOT screwed tight. The gas needs to escape from the jars, otherwise there will be a big mess in the kitchen. Once a day take a fork and poke around the jar to assure the mixture is fermenting evenly. After that, every time make sure all cabbage is covered again by liquid.
6. After 2 more weeks the raw sauerkraut is ready to eat: raw or cooked. The lids can be screwed tight now and jars can be stored in the pantry. Come back for more sauerkraut recipes.
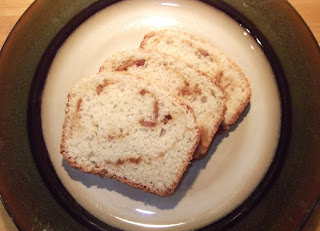
If you like the texture of the raisin bread you’ll like the orange sweet bread. It bakes easy, tastes great and stores really well. Perfect with morning coffee or after meal as a desert. I don’t put too much of the orange marmalade so the orange flavor is not overpowering, but that can be easily altered individually. Its good on its own, with a little butter, ice cream or more marmalade for the ultimate sugar fix.
INGREDIENTS:
4 ½ cups - all purpose flour
¾ cup - granulated sugar
 4 ½ tsp - dry yeast
1 tsp - salt
½ cup - unsalted butter
2 - eggs
¾ cup - milk
½ cup - water
1 tsp - vanilla extract
¾ cup - orange peel marmalade
EQUIPMENT:
1 large bowl,
1 large wooden spoon,
2 5”x 9” bread baking pans,
 1 cotton cloth towel.
DIRECTIONS:
1. Mix all dry ingredients (including yeast) in a bowl, melt butter,
2. Wisk eggs in a separate bowl, add to the dry mixture; add milk and water, then add the melted butter. Mix all with big wooden spoon until the dough is smooth,
 3. Cover the bowl with the cotton cloth towel and place in the warm place for the dough to rise for 1 to 1 ½ hours. It should double the volume.
4. Oil baking pans (5“ x 9“), dust with flour.
5. After the dough rose, spread it on the flat surface dusted with a little flour so the dough wouldn’t stick (clean table surface works great). Shape to about 18” square, spread thin layer of jam on top of the dough, then carefully roll the dough. Cut in half and place both portions in the baking pans.
 6. Cover with cotton cloth towel and place in a warm place to raise. The dough should raise almost to the top edge of the pan.
7. Bake in 350F for 25 minutes.
8. Take out of the pan, cool on side, enjoy with tea or coffee.

Hot cup of creamy lentil soup always feels good to eat. The recipe is very simple and requires only few ingredients. I usually buy 1-2 lb of red lentil, grind it into powder in the blender and keep in a glass container in my pantry. Yes, it takes about 25 min to cook, but its genuine ingredients will beat the artificially flavored and preserved instant version anytime.
Makes 4 servings
INGREDIENTS:
1/3 cup - red lentil powder (ground from lentil beans)
4 cups - water
1 tsp - dry minced onion
1 tsp - all purpose seasoning of choice
Salt
EQUIPMENT:
2 qt pot
12 oz glass, cup or other dish
DIRECTIONS:

1. Pour 3 cups of water into the pot and bring to boil. Add dry minced onion and good pinch of salt.
2. Mix lentil powder in the remaining 1 cup of water. Mix well so the mixture is not lumpy, add to the boiling water with spices.
3. Bring to boil stirring continuously. When boiling, lower the heat and simmer for 20 min stirring occasionally. After 20 min turn off the heat and let sit for another 5-10 minutes.
4. Serve with croutons, slice of bread, or on its own.
I probably wouldn’t get out of bed in the morning if I wasn’t looking forward to having a coffee… It is a real treat and coffee flavor (natural of course), whether it’s ice cream, cookies, cake, chocolate or others, makes every dish a treat for me. Coffee liqueur is one of them too. Did I say it’s easy to make…? There we go:

INGREEDIENTS:
375 ml - 40% vodka
1/8 cup - coffee beans
1/4 cup - granulated sugar
500 ml - water (boiled and cooled to room temperature)
DIRECTIONS:
1. Put the coffee beans into the bottle or jar containing vodka. Leave them soaking for 24 hours only,
2. Strain, run through the coffee filter for clarity,
3. Add water and sugar.
4. Age for 2 hours, enjoy with moderation.

You can add more sugar if you prefer sweeter taste and use coffee instead of water for darker color. Have fun experimenting. It can be served chilled, on its own, or on ice with a tbsp of a very fresh heavy creamer. After you taste it, you may wonder why you paid so much for the fancy coffee liqueurs at the store…
Crapes are very easy to make. They take few minutes each to cook, but the versatility and flavor make up for that. I usually make bigger batch and keep them in the refrigerator. They can be prepared with a variety of spreads or stuffing and served as a main course, an appetizer or a snack.
INGREDIENTS:
Dough:
2 cups - whole wheat flour
3 cups - water (24 oz)
1 egg
2 tbsp - canola or other cooking oil
½ tsp - salt
 Cream Cheese Stuffing:
8 oz - cream cheese
3 tbsp - granulated sugar
1 tsp - vanilla extract
EQUIPMENT:
- 2 qt bowl
- 1 qt bowl
- whisk
- 4 oz ladle
- spatula,
- 9” non stick frying pan
1. In 2 Qt bowl whisk together flour, water, egg, oil and salt,
2. Warm up the frying pan on medium heat,
3. Pour batter with the ladle, about 3 oz of it, onto the preheated frying pan tipping the pan in circular motion to evenly distribute the thin layer of batter on the pan.
 4. Cook one side for 2-3 minutes or when the crape peels off the pan on its own. It should slide freely on the surface of the non stick pan. Flip it on the other side and let cook for another 3-4 minutes. The crape should have light brown irregular marks on both sides but every one will look different, so don‘t look for the pattern. The best way to check if the crape is cooked well is to taste the first one and get the idea how long they need to cook. The time will depend of the heat and the thickness of the crape.
 5. In smaller bowl, mix the cream cheese with sugar and vanilla. Fork works really good for that task. Spread the mixture with the spoon on the crapes after they cool down and roll each one tight. Recipe makes about 8 crapes.
The recipe here calls for the whole wheat flour for the benefit of the fiber, but I have to admit that the all purpose unbleached wheat flour is my favorite for the crapes. Other options of stuffing the crapes would include a jam of choice (sweet version) or meat or fish paste.
 I always loved the yeast coffee cake my grandmother made. I tried to make it myself, but it always seemed like a chore. Messing with yeast starter, looking for warm place to accommodate raising of the cake… too much trouble. Today, I still love grandma’s yeast coffee cake, but I found an easier way to make it.
INGREDIENTS:
 Dough:
4 ½ cups - all purpose flour
¾ cup - granulated sugar
4 ½ tsp - dry yeast
1 tsp - salt
½ cup - unsalted butter
2 - eggs
¾ cup - milk
½ cup - water
Dough:
4 ½ cups - all purpose flour
¾ cup - granulated sugar
4 ½ tsp - dry yeast
1 tsp - salt
½ cup - unsalted butter
2 - eggs
¾ cup - milk
½ cup - water
 1 tsp - vanilla extract
Optional: 8oz - Jam of choice
Crumbs:
½ cup - granulated sugar
½ cup - all purpose flour
¼ cup - unsalted butter
1 tsp - vanilla extract
Optional: 8oz - Jam of choice
Crumbs:
½ cup - granulated sugar
½ cup - all purpose flour
¼ cup - unsalted butter
 EQUIPMENT:
1 Large bowl,
1 Small bowl,
1 Large wooden spoon,
1 Wisk or fork,
13” x 15” baking pan,
1 Cotton cloth towel.
DIRECTIONS:
1. Mix all dry ingredients (including yeast) in a bowl, melt butter,
2. Wisk eggs in a separate bowl, add to the dry mixture; add milk and water, then add the melted butter and vanilla. Mix all with big wooden spoon until the dough is smooth,
3. Cover the bowl with the cotton cloth towel and place in the warm place for the dough to rise for 1 to 1 ½ hour. It should double the volume.
4. Prepare the crumbs. Mix flour with sugar, then add melted butter. Mix until crumbs form. The mixture should be somewhat dry and sticky to form clusters.
5. Oil baking sheet (13“ x 15“), dust with flour.
6. After the dough rose spread it in the pan, spread thin layer of jam on top of the dough, then scatter crumbs evenly.
EQUIPMENT:
1 Large bowl,
1 Small bowl,
1 Large wooden spoon,
1 Wisk or fork,
13” x 15” baking pan,
1 Cotton cloth towel.
DIRECTIONS:
1. Mix all dry ingredients (including yeast) in a bowl, melt butter,
2. Wisk eggs in a separate bowl, add to the dry mixture; add milk and water, then add the melted butter and vanilla. Mix all with big wooden spoon until the dough is smooth,
3. Cover the bowl with the cotton cloth towel and place in the warm place for the dough to rise for 1 to 1 ½ hour. It should double the volume.
4. Prepare the crumbs. Mix flour with sugar, then add melted butter. Mix until crumbs form. The mixture should be somewhat dry and sticky to form clusters.
5. Oil baking sheet (13“ x 15“), dust with flour.
6. After the dough rose spread it in the pan, spread thin layer of jam on top of the dough, then scatter crumbs evenly.


